If you’ve looked at drop shipping and decided you want a more passive way of making money then creating Amazon affiliate sites is definitely something to try.
After many years of drop shipping myself, I diversified my portfolio and started to build ‘micro niche’ Amazon affiliate websites. These are review style websites that target a small number of products or niches, primarily aimed at buyer related keywords.
Someone reads your review, clicks through to Amazon and you get a 5% commission on any sales they make.
One of the first websites I started was targeting bikini body keywords, and it just so happened Kayla Itsines (Instagram fitness freak) launched her own e-course so I setup a two page website recommending an alternative.
While that alternative wasn’t anywhere near as good as Kayla’s course, it converted like crazy!
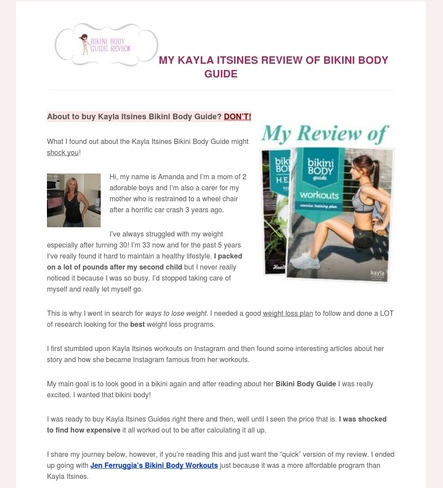
While not quite Amazon affiliate, the business model was the effectively the same. Clickbank were paying me commissions on behalf of the vendor who created the product, ‘Jen Ferruggla’s Bikini Body Workouts’
My review website grew in popularity and my commissions exploded especially after hitting it with a number of powerful links. I ended up on page one of Google for the keyword ‘Kayla Itsines,’ but refunds came just as fast, as the course just wasn’t at the same level as Kayla’s.
Since then I’ve moved onto the Amazon Associates program applying the same technique (creating review style websites) and working with mini niches to create multiple profit streams.
Here’s an example of one of my first websites I created.

Today I’m going to show you how to make money with Amazon affiliate sites. Trust me, If I managed to start 25 of these sites while working 50 hours a week in a 9-5 job, you can too. Don’t feel like it’s going to take months of writing to start, we can get someone else to do that for us too.
Successful Amazon Affiliate Niche Websites
I’m not one to out other marketers niches unless they’ve publicly posted their own websites, so the examples below are from other marketers I follow or work with. This should give you some inspiration as to what you can achieve if you put your mind to it and treat this like a real business.
10Beasts.com
This blog is owned by someone from Vietnam (proving this is a business you can run from anywhere) and includes about 5 articles. Yes, 5! Yet they manage to pull in over $20,000 a month on average through Amazon Associates with some months hitting $50,000.
It would be fair to say, it’s nearly impossible for the average marketer to rank in the top three results for keywords such as ‘Best Wireless Router’ or ‘Best 3D Pen’ but they managed to do just that in under one year.

Foot Cream Reviews
This blog is in a micro niche and specializes in a specific type of cream, for your feet. The website is making $1,000 a month after only 6 months, and is currently being sold on Flippa for over $20,000.
The site is created using WordPress and includes less than 15,000 words of content. While it’s not obvious in the Flippa listing, the site has powerful PBN links pointing at the website for fast rankings.

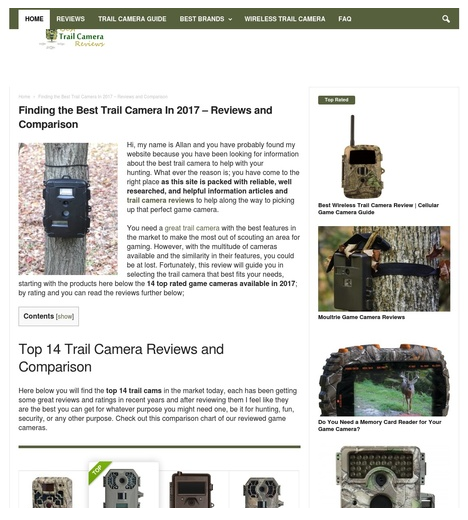
Best Trail Camera Reviews
A website purely about hunting cameras, this WordPress blog is very written and includes links to Amazon products. The site includes individual reviews which target long tail keywords and a few huge reviews such as the top 10 hunting cameras for 2017.
The blog generates over $10,000 per month on Amazon Associates and there’s less than 20 reviews in total. The level of detail the reviews go into is very intense which is why the site does so well.
The Basics
I always host my niche websites (also called money sites) with a reputable provider such as Bluehost.
I’m also going to assume you know how to apply for an Amazon associates account and live in a country which is supported by such an affiliate scheme. I recommend waiting and applying after you have created your website for better acceptance rate.
You don’t have to use Amazon associates either, you could use competitors such as Jet.com, Best Buy, Walmart or Target. As Amazon has different localities, you can target visitors from around the world.

Preparation – Niche Selection
This is definitely one of the hardest things about starting a micro niche website. First you need to decide if you’re going to write the content yourself or outsource to someone else.
If you choose to go it alone then you should choose a niche that interests you. For example, I’m interested in computing, networking, traveling and technology. If I decided to write about the best dog kennel for under $300 I would never get into the topic and the end result would be a pretty poor article.
If I found someone willing to write for me that was interested in dogs, pets or animals then they would probably come up with an awesome article.
I usually find writers at Upwork but there are many other alternatives.
So for me I might create a review website on the ‘best gaming office chairs’ or ‘best 13 inch laptops.’ Your’s might be similar or completely different. Remember to think outside the box too as all the usual niches are going to be too difficult to rank for, i.e. ‘best wireless routers’ or ‘best laptops.’
Pick An Less Competitive Niche
The best way to find out how competitive your niche is likely to be, is to head over to kwfinder.com or get a trial with Long Tail Pro and find out.
You can enter keywords or search terms and find out the SEO scores. Anything higher than 50 I tend to stay away but it’s definitely possible to rank for such keywords. I prefer choosing keywords with a score of 20-35.
You can plug in your ideas and you’ll get a SEO difficulty score. It’s a rough guide though.

Building The Website
I found this infographic online and I had to share it with you, I think it’s perfect for this topic.
Creating your micro niche is a six stage process. If you don’t want to do this manually either you can usually find someone on Fiverr willing to do the initial manual labor for five dollars.

The next step is to start creating a website to write about your micro niche. As I explained earlier you will need to purchase a domain name, web hosting and probably a template for your site.
Correct Domain Selection
There’s a wealth of information online about choosing the perfect domain name and most of it comes down to SEO technique. The number one concern is whether you should include the main keywords of your micro niche in the domain or not.

Many first time niche site creators rush out and try to buy, ‘bestkeywordreview.com’ when this is probably not the best approach in 2017. Back in the early 2010’s it definitely was, but times have changed.
If your niche was say 13 inch laptops, should you buy an exact match domain (13inchlaptops.net), or choose something different such as, ‘awesometechreviews.com’?
Personally I’ve tried both and can safely say I haven’t been penalized by Google for doing either (yet), but in terms of expanding your site in the future presents many issues.
Let’s say you want to expand your site into another niche then your rather stuck. Wouldn’t it be weird to turn up on a site called 13inchlaptops to read a review about a mobile phone?
The SEO guys will probably point out that if you create an article on 13″ laptops, your probably going to end up including your keyword twice..
Double stacking keywords could (keyword here, being could) become a problem in the future.
According to Google there is no difference in ranking any extension over another so don’t freak out and think you need to use .com or .net. I’ve used specialty domains such as .review, .ltd and .co with results just as good as .com.
The only domains to stay away from are country level domain names unless you want to rank locally (but that’s a different article).
Finding Your Domain
This is another area that most newbies trip up on. Ranking a brand new website in Google can take easily 6-12 months at the best of times. The quickest way I can recommend speeding this process up is to buy an expired or soon to drop domain that has some backlinks.
It’s important to note that you definitely don’t want a domain that has been used for spam, but you do want a domain that was in a previous life a thriving website with content and some traffic. If you buy such a domain and resurrect a website you will definitely rank within 1-2 months.
The best place to find expired domains is PBN HQ and I’ve done a full review here.
Other options include ExpiredDomains.net, Godaddy or Sedo auctions, but prepare to dig deep into your pocket for the perfect domain.
Registering Your Domain
The cheapest company I’ve found to be is Namecheap.com and they offer free whoisguard for 1 year. The amount of spam you’ll ultimately receive makes the whoisguard an invaluable addon to protect your email address and personal details from ending up on a Russian mail server.
Make sure to set the name servers to the same company as your hosting is setup with. You definitely don’t need to use fancy services such as Cloudflare or other IDN services until your site starts to generate substantial traffic.
Installing WordPress Correctly
I can hear you screaming at me now, everyone knows how to install WordPress these days as most hosting companies offer 1 click installers. Believe it or not, most people actually miss one of the easiest ways to take advantage of a domain’s previous authority for quicker rankings.
Remember I told you to check for domain spam if buying an expired or dropped domain, head over to Moz Site Explorer and enter your new domain as, www.domainhere.com and http://domainhere.com and see which one comes back with the higher Domain Authority figure.
Got it? Make sure you install WordPress on the same one.

Nice work, you’ve just helped yourself take advantage of a little bit of domain authority. The figures on this website don’t mean very much these days so don’t read into too much.
Installing WordPress Plugins
Every micro niche I setup ultimately gets the same default plugins added:
- Contact Form 7
- Thirsty Affiliate Links
- Yoast SEO Premium
- EazyAzon
- Content Egg
- Shortcodes Ultimate
- Table Press
Contact Form 7
This is a nice plugin that allows you to create a contact page in a few minutes. You can forward the messages to any email address and WordPress will handle the email sending automatically. One of the best features is the Google captcha to keep the spammers away.
Thirsty Affiliate Links
I struggled for years to find a decent plugin for concealing affiliate links and finally I found a reputable company in the form of Thirsty. The plugin is free of charge.
Yoast SEO Premium
This is a plugin designed for optimizing your search engine visibility and comes in two versions, free and premium. When I first started out I was using the free version until I discovered the paid version offers 404 redirections which can be be very handy when using expired domains.
EazyAzon
This is a plugin that integrates with Amazon’s API and allows you to display products on your site and then link to them using your Amazon affiliate code. You can use advanced features too such as sending them straight to the cart page depending on their locale Amazon website or display rollover pop up pricing on your website. It’s currently on special here.
Content Egg
I’m actually a new comer to this plugin and only found it after reading a review on a Facebook group last year. It works similar to EazyAzon but uses real time pricing to display tables of products instead of relying on manually creating affiliate links. It’s currently available in a free and premium version. Again depending on your budget you can choose either but I prefer the premium edition. You can get Content Egg here.

Shortcodes Ultimate
Whenever you need to do something funky or create a box, table, video, image or tabbed section you can quickly click a button within the WordPress window and wolah your ready to go. It’s a time saver if anything.
Table Press
I’ve struggled for years to find a decent table plugin for WordPress and to be honest I think it’s still a pretty average plugin but there’s nothing better. If you’re a WordPress developer then there’s a business idea for you.
The Perfect Template For Your Amazon Site
Different people like different templates but the most important factor to remember is you’re building a website for readers, not your own personal gain. With that said you need a template that looks professional and loads correctly on a wide range of devices. This is called a responsive theme.
I’ve spent thousands of dollars over the years buying premium themes from places such as MyThemeShop and Themeforest.
The best theme I actually found, that worked for my Amazon niche sites was called MH Cicero Lite and is available as a free and paid option. The free version is good enough but I make some big changes such as removing the title bar.

There are many other options out there specially designed for AMZ affiliate sites. You’ll hear many people recommending premium themes such as:
Website Site Structure
Different marketers have different ways of structuring their website and there is no right or wrong way of structuring your site. With that said this is how I structure most of my review style websites.

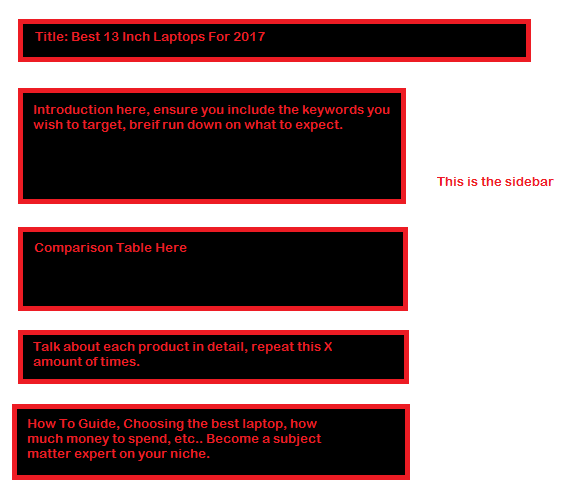
Usually I make the home page the default page with the longest and most detailed piece of content. For example if I was creating a review on the best 13 inch laptops, I’d make the homepage a detailed review on this, include a comparison table, individual product reviews and a tutorial section on how to select the best laptop.
Some marketers would say you shouldn’t make your main article the homepage and if your end goal is to create an authority site (i.e. many different niches/categories) then I’d agree with them.
For example 10Beasts.com doesn’t have a homepage with an article, but then they are focusing on many niches. If you’ve got 1 niche then I recommend doing what I do, but there is no right or wrong answer.
This first page would usually be 5,000 words in length. I call this my main page.
From this page I’d link to 5-10 individual posts (reviews) about individual laptops which would be 1,000 words long. In each article I’d link back to the main page. I’d then create 10 x 500 word blog posts which would be posted on the site every week for 10 weeks, linking to the product reviews.
Total content is 15,000 words minimum.
Homepage: 5,000 Words
Reviews: 5 x 1,000 Words
Blogs: 10 x 500
Total: 15,000 Minimum.
Let’s say you pay a content writer $10 per 1,000 words, a website could be created for $150.
Creating Content For Your Site
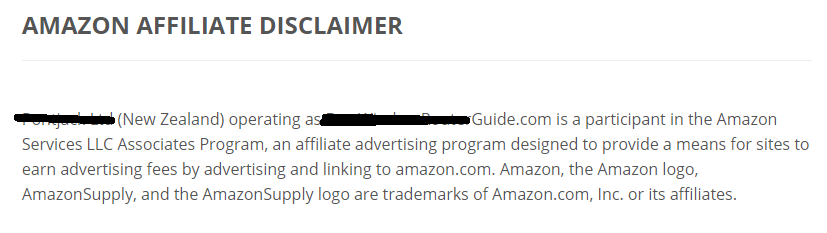
Now that you’ve setup your website you need to add content and the legal disclaimers for your Amazon associates products you’ll ultimately link too. If you don’t have this you might get banned.
Most people do this by creating a page called, ‘Amazon Affiliate Disclaimer‘ and place the link in the footer page.
You can copy mine,
Creating Your Main Page
The main page as discussed is the homepage and should include a huge review and a getting started guide on your niche, for example if you chose a niche called, 13 inch laptops you would structure your page similar to this:
Once you’ve created this page ensure you set your WordPress permalinks to just show the post name, and to make this page the homepage.
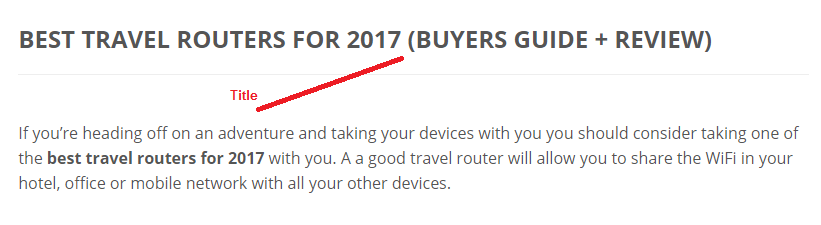
Correct Title Structure
You should start by creating an awesome title that includes your main keywords. If you were targeting 13 inch laptops then you might do something such as,
‘Best 13 Inch Laptops For 2017 (Buyers Guide)’
Yoast SEO (if you use it) will help you create a page title that is optimized for search engines but if you aren’t using this, ensure your title is no longer than 60 characters.
You should include all the main keywords you want to rank for. Don’t worry about long tail keywords here.
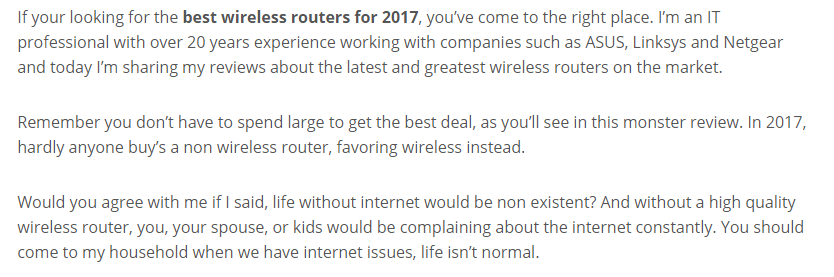
Introduction Structure
This section of the page comes down to personal opinion and you can do whatever you want. I’ve seen many people skip this section, others have tried to come across as subject matter experts and others have just started what’s going to follow the introduction.
Here’s an example.
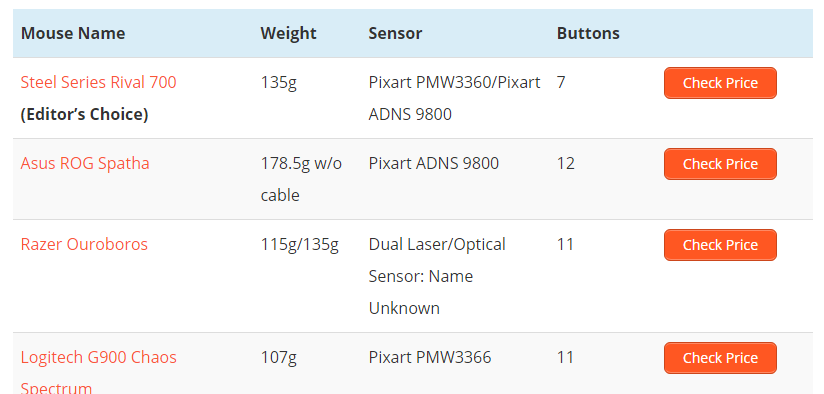
Comparison Table Structure
The next step is to add a comparison table, I tend to add an H2 tag with the keywords again before the table is embedded on the page.
For example, ‘Best Gaming Mouse For 2017’
Then embed the Table Press comparison table using a short code.
I’m not going to show you how to create a Table Press table so if you want further help on that checkout this page.
If you’re wondering what things to add, think about specifications, technical info and deals.
Comparison Table Content Egg
If you’re not a fan of spending hours creating tables then you can cheat? using the Content Egg plugin. Once installed and connected with your free Amazon Web Services API account you can select a bunch of Amazon products and display them in a table with real time pricing.
You will however lose out on the ability to rank in Google using Schema but it’s a quick way to add comparison tables with real time pricing.
Here’s an example.
 Write About Amazon Products
Now you need to write about your products/services in great detail and review them in detail. Remember how I said to do a main page and then a review of each product?
Try to make the main article less technical, i.e. for a buyer rather than a subject matter expert.
In the actual page for each product/service you should dive into the technical information.
I tend to follow the structure such as:
- H2 tag for product/service name
- Catchy introduction
- Technical details
- Why it’s good, was ranked 1.2.3.4. etc
- A pros/cons table
- Link to the buy page.
Rinse and repeat this for all products on your comparison table. If done correctly you’ll likely be up to 2-3,000 words by now. If you are struggling to write content, head over to the Amazon page and start writing technical jargon such as the weight, size, usage costs, product life etc.
Linking To Amazon Products
Now you’re ready to link to products, there’s a few ways to do this. If you had the EazyAzon plugin you could simply highlight text areas and create a link to an Amazon product, alternatively you could use Content Egg to link or use the good old fashioned manual linking with ThirstyAffiliates.
If you’re just starting out I’d recommend using ThirstyAffiliates, but EazyAzon can be much easier if your targeting international audiences as the plugin will redirect visitors to their locale Amazon site.
Wolah, your main page should now be complete in terms of content that will make you money.
Subject Matter Expert Buyers Guide
The last step on the main page is to create a buyers guide or subject matter expert to prove to buyers you are the real deal and know what you’re talking about.
Let’s take 10beasts.com for example, they’ve added a wireless router buying guide to their comparisons so visitors trust them.

Individual Product Reviews
The next five or ten pages I then create are individual reviews of the products that were in the main page. Let’s say I reviewed ten of the best 13″ laptops, I would then do 1,000 words on each one.
Link each product review to the main page.
Drill down into the details here, technical jargon. You need to be an expert, appear like you did all the tests, reviewed the product to the max. Anyone can copy content from Amazon, but successful marketers use that and make it 10 times better.
Make sure there’s lots of high quality photos (all linking to your Amazon aff link) and even create a review video.
Include graphs about tests too, such as this.
Blog Posts To Boost Content
Google hates websites that aren’t updated frequently and you’ll struggle to rank if you don’t update your website atleast once per month. Spend some time early on and create 5-10 blog posts that fit with the content created thus far.
Make your blog posts relatable and interesting. They don’t have to be high quality but content spinning articles probably won’t work here.
Make sure each blog post is setup for Yoast SEO and links to your main articles and/or the home page.
Website Testing
Now that you’re website is complete and ready to roll you should ensure it works correctly.
The most important factor is to check there are no broken links, this can cause huge problems with SEO.
Other things to check include:
- Website works on both mobile and desktop devices (responsive)
- Paragraphs aren’t too long and don’t run off the end of the page
- Text font is looking on point
- All pages/posts are setup with Yoast SEO.
If all looks good, it’s time to start SEO’ing your micro niche.
Search Engine Optimization Techniques
Different marketers have different techniques here and this is a brief rundown on what I do. I’ve been testing different techniques for the last few years and have learnt a lot.
I recently found out about this method from Matt Diggity, one of the all time God’s of SEO and involves creating stacks of high DA properties from Web 2.0’s, Youtube, Scoop sites etc. These are all linked randomly with no patterns but all lead to the money site.
You can read more about this on Matt’s blog, he explains it much better than I can.
Basically if you have a new website and a stuck on the low page results then you can boost the domains authority using the method.
There’s many people offering the service (around $50-$100) but I recommend Rank Jacker on Konker.
Another technique that I came across from following some of the best PBN builders in the world and definitely a sure fire way to boost your social network presence without creating and maintaing many social media accounts for your business.
Again I use Konker or Jonathan over at PBN Butler.
I usually send 300 – 500 signals every few months.
A hot topic and many people who’ve been screwed over by search engine penalities will tell you that PBN links don’t work anymore. The bottom line is that they do work, if used correctly. You definitely won’t rank well if you’re buying one time $5 links from Fiverr.
You need high quality links from networks such as DiggityLinks, Contenthourlies or Konker.
Some people also recommend using SAPE links and these can be a great way to boost a website’s rankings. SAPE is a Russian network but they are working on launching an English verison currently.
I’d recommend building 10-20 PBN links to your website over a 2 month period.
Don’t think you can just buy PBN links and point them at your site these days, you will have to do some blogger outreach and get genuine links to your website. I recommend getting a content writer to create 10-15 short articles and reach out to blogs in your niche and get them to post on your behalf.
I’m not going to stretch this article out to 5,000 words and show you how to do blogger outreach so I suggest you read this article.
Tracking Progress
Now that you’re starting to drive traffic to your micro niche website (it may take a few months) you’ll want to ensure you’re tracking your progress and following your best keywords.
There’s a range of tools I use here,
- Google Analytics
- Google Webmaster Tools
- Majestic.com
- Ahrefs.com.
Google Analytics
If you don’t know what this then you probably don’t have your own website yet, it’s an invaluable tool for tracking the traffic to your website. Make sure you don’t use the same analytics account on your PBN’s though, you’d be surprised how many people do that.
Make sure you track your progress daily, find out who’s sharing your content and where your visitors are coming from.
Google Webmaster Tools
One of the biggest downfalls of analytics is the inability to track where all your traffic comes from via search engines. Where Google Analytics lacks, webmaster tools certainly makes up so make sure you get setup with both.
You can then quickly track the most common search terms and track clicks. Webmaster tools is also a great tool for indexing your new posts quickly.
Majestic
If you’ve read my post on expired domains then you’ll know how valuable this tool is (although slightly expensive). You can quickly find out which domains are linking to yours, the anchor texts, number of pages linking and whether your domain is being spammed.
If you create a successful micro niche you’ll quickly realize there are some other marketers out there whom will do everything they can to sabotage your success. Majesitc is updated frequently and can pickup on shitty spam links pointing at your website.
Ahrefs.com
The last tool I use is Ahrefs and that’s to check for the latest search terms my websites are ranking for. You may be completely unaware of what keywords and search terms your site is ranking for without the help of Ahrefs and they have one of the largest databases online.
Similar to Majestic the monthly fee is eye watering for beginners so you may find this is something you add once you start to grow.
Conclusion
If you’ve made it this far then I congratulate you, this post took many hours to write and I hope it was helpful. This should give you a good insight into starting your own Amazon affiliate website or micro niche website. There are of course many courses out there that will go further into detail.
One of the best courses on the market currently is Savage Affiliates, by Franklin Hatchett.
Savage Affiliates is a membership course, created and built by Franklin Hatchett, a kiwi ‘God’ of Amazon affiliate sites. Over the course of 5 years he’s built and grown dozens of profitable affiliate websites which he then flipped on sites such as Flippa and Emplire Flippers.
I personally took this course when I started to create my own Amazon affiliate websites. If you want to learn like me, I’d recommend getting on board now.
I’ve done a full length review of his course too.
Last Updated on July 31, 2017 by Rhys Dale

Rhys is the owner and chief editor at Im Rhys and is living in Chisinau, Moldova. With over 15 years experience in eCommerce and Affiliate Marketing he has started many successful 6 and 7 figure businesses. After successes with USA and China dropshipping, he expanded into building 70+ micro affiliate websites in 30 different niches that generate money on autopilot. He now helps his wife to run her social media agency as well as travelling the world at every opportunity.
I find this article very helpful and better than some paid courses. With the content of this article, you stand out unlike a lot of the marketers who are only interested in making money out of those on their list. A lot of thought have been put into writing this article and the content are of very high quality. With this article you have demonstrated you have the interest and the progress of your subscribers in your heart.
Thank you for your generosity. I wish you all the very best in all your future endeavours.
Foley
Hi Foley,
Glad to help out, I found many of those courses aren’t worth the thousands of dollars they charge so wanted to create a free resource for my readers. AMZ Affilite Bootcamp is a good resource for further learning.
Stay tuned for more articles coming up in the next couple months.
Rhys
Thanks so much for this Rhys! I will follow every step and be successful like you! 🙂
Thanks KT 🙂 Enjoy and hope it helps.
Really appreciate your time and in depth review for all your courses drops shipping, tools and tips etc
They’re extremely helpful and going deep makes a big difference in helping to choose and use tools and tips what’s working and not
Thanks for sharing and please don’t stop
Truly appreciate your efforts mate fr Australia
Thanks mate, glad to help out.
This is by far the best and my favorite article on getting started with Amazon affiliate sites and affiliate sites in general. I started my first (and only so far) affiliate site in Dec of 2016 and only making a couple hundred bucks a month at the moment(had no idea how to do keyword research and ended up with a very competitive niche). While following along with this article, I’ve been doing research and think I have found a micro niche I want to try out. Thanks for your guidance and look forward to reading more useful posts like this!
Hi Kraig,
Thanks for your kind words of support, I’ve been helping my clients with Amazon affiliate and dropshipping sites for the last few years and want to share that information with other like minded entrepreneurs.
Rhys
Great article!!! large amount of info condensed in short easy to read, well done and keep up the good work man.
Can you touch on payment options for the Amazon associates program please, in particular what would be the best options for NON-USA residents. as it stands Amazon offers payouts/redemption with the following options
1) Amazon Coupon
2) Direct Bank Transfer/payments (US BANK ACCOUNT ONLY)
3) Cheque Payment – for non-USA residents
So far I’ve come across PAYONEER (www.payoneer.com) as an option for a bank account with card details that works for option 2 direct bank transfer/payments (as a non-USA resident). Have you ever looked into the Payoneer option?
What option do you personally use along with your amazon associates account payments? are there any other options on the table worth looking into?
Thank you for your time and efforts!
Hi HK,
I use the cheque option, it only costs me $25 to deposit it with my bank. Given I’m doing 5 figures it’s a small price to pay.
I’ve never looked into Payoneer but I’ve heard good reviews about them from friends.
If you’re doing huge numbers (6 or 7 figures) I know they offer bank deposit too, maybe email them for that option.
Sorry can’t help further.
Thanks for your response. I went on and created a payoneer account for now, took about 3 hours from application to approval not bad at all.
We’ll make that call to Amazon when we hit those 6or7 figures 😀
thanks again and keep up the good work